This post won’t be easy for me, my father died last June at the age of 59.
And to honor him going to publish my last hobby project I could share with him.
‘Rust-like’ playing game
I would describe my game as an roque-like/ role-playing hybrid. In its essence you are the Hero TamaNu, you run around on each level killing monsters collect better items and on every tenth level you have to beat a boss-monster. I started the game with one goal, learn how to code Rust and keep the game as simple as possible. So there is that, the game works but don’t expect to much from it. By the way, TamaNu, was the first name my father choose for his main-character in rpg’s.
Build Game
To build the project I recommend, that you (on fedora/linux) install the packages rust, cargo and ncurses-devel. After that, checkout the project from Github. Now open a terminal and type cargo build into the console. The binary rpg should be in ./target/debug/.
How-To Play
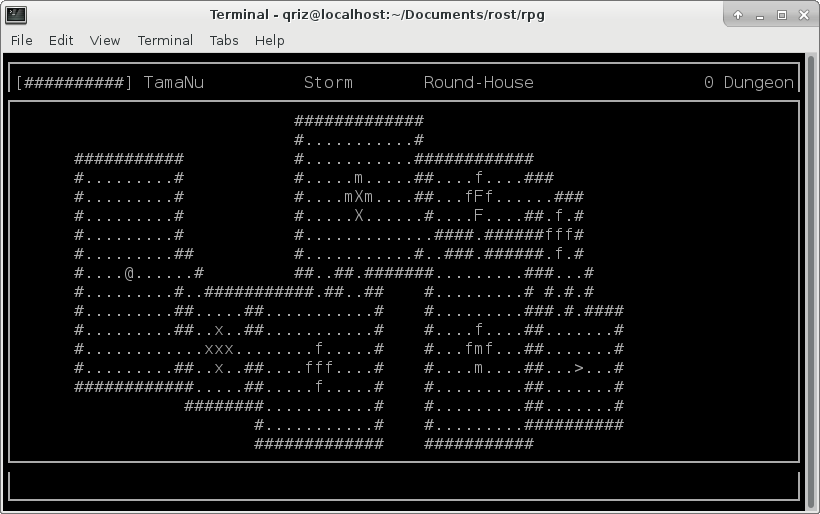
What you see
After starting the application you are directly thrown into the gameplay. The gamescreen consists of three parts: player-view (top), map-view (middle) and game-log (bottom). The player-view shows the current health the readiness for the two special attacks and how many dungeons the player cleared.
The log simply outputs message’s from the gamecore e.g. damage dealt or taken.
The map-view always draws the whole map. @ of course is the player, < Is the player’s spawnpoint and > are the stairs to the next dungeon. The x's, f's and m's are monster you can kill. A death lootable monster will be rendered as O, a death nonlootable monster is rendered as _.
Controls
Move around with the Arrow keys, to deal damage press w, a, s or d. The keys correspond with the strike-direction. As far as I know this isn’t a standard roque-like pattern, so to make it clear what happens I visualized keys with hitarea:
  w  | a  |  s  | d
---------------------
 ### | #  |  @  |  #
  @  | #@ | ### | @#
     | #  |     |  #
For the special attacks, to storm press 1 and a attack-direction (w, a, …). To round-house-kick simply press 2 and every monster directly around you will be hit. Special attacks do have a cooldown but will always deal critical damage.
To loot an enemy stand directly over the lootable monster and press e, you are now in the loot-screen. The > is an courser for the current item, press e to add the displayed item to your backpack. Press q to quit the loot-screen and to return to the game-screen.
To equip your new item you need to stand free, and again press e, you are now in the character-screen. You can change between your character and the backpack with the left and right arrow-key. Again the > is a courser for the current item. To equip an item press e, and to throw away an item press r. Again to get to the game-screen use q.
To get to the next level, you have to stand directly over the > and press e.
If you ever want to quit the game, press q and than to confirm press e.
Game-Dev
What’s a “Post-Mortem” without Game-Dev history and the engineering part?
History
It’s really hard for me to reconstruct the history from point zero, given that I created an vcs repository after the first major steps where done. So you can take this statement as an advice to create an git-repo as early as possible. But to give you an overview I can break the development into two stages, in the first stage I created the core game-mechanics and tested them with unit-test, after that new features where directly tested inside the game.
The core parts where the characters (with stats/ items/ backpack), fighting and an map. After that I implemented: AI, Looting, Level-, Monster-. and Item-Generator.
Interesting Parts
In the following I want to introduce you to some interesting parts of my game and explain how they work.
Fighting System
The system I created, is as the game quite simple, it uses three stats: vitality, strength and defense. Vitality is used to derive the max-health for an character the other two variables are used for the fighting. Strength acts as an damage bonus and defense as its counterpart. If you hit an enemy, that enemy-defense bonus will be used to decrease your strength bonus. The remainder will be added to your weapon min/max-damage. And that pretty much is everything.
The Generators
The game contains three different generators: Level-, Monster- and Item-Generator. The Level-Generator begins with a random room-count. Each Room will have an random dimensions and will randomly placed in the available level-space. After that the room nearest to the monitors middle will be identified and the other rooms will be pulled towards the middle-room. After that we need to connect the rooms.
At first, I build an algorithm which connected each room to its nearest neighbor-room. Which works partly because, there is a great chance only clusters of rooms will be connected. So I applied another algorithm to make sure that each room really is connected, I used a sweep-line-like algorithm moving from left to right and connecting each room.
Finally in the last-step meta-data like: player spawn-point, next-level and monster-spawns will be added. The monster spawns consist of predefined patterns that again are randomly distributed, one pattern per room.
To generate items, three inputs are needed: the item type to be created, the monster difficulty and the current item worn by the player. For the following text I have to define the quality of an item, which is measured by its attribute sum. It should be obvious that I need the item type as input. The current player item is needed as an orientation and to achieve a constant growth of the player. We need the Monster-difficulty to determine if the player-item is improving or worsening, or how much the quality of the generated item should differ from the current one. Or to put it another way, the generator creates an item for the monster-difficulty Normal which is of a minimum of 2 worse and maximum of 5 better than the current item.
To get back to the code, first the interval limits for the potential quality are calculated, using monster-difficulty and the current item as explained above. Afterwards, the total number of points to be distributed is determined by chance. Afterwards, the amount of points to be given for a specific attribute is rolled. If you look at the individual result, it has a different quality and a different distribution of the attributes. However, if you look at the sum of the items over multiple levels, you see a steady increase in item quality.
In the core of the monster generator, for the monster character attributes, the player values are used as the basis and multiplied by a magic number. That’s it, in order to achieve satisfactory results. In this case, the question arises how the Magic-Number was created. The monster-design. ods file, which can also be found in the repository, is responsible for the creation for this number. In principle, I have used this file to recreate the fighting system and the monster generator and determined two key values: time-to-kill and time-to-death. Afterwards I defined different values for the different monster-difficulties. I thought it was appropriate that the player needs 3 hits to kill a simple monster (Time-To-Kill) and the monster needs 100 hits to kill the player (Time-To-Death). The resulting magic-numbers were inserted in to the code.
Evaluation of Outcome
I did not expect much from my game from the beginning, it should work and it does so. From this perspective, I am absolutely satisfied. Apart from that, I have to say that for me rpg’s have always been a bit of magic. You have your equipment, your skills and you invoke an action and then suddenly magical numbers appear. And people argue about OP-classes and skills and so on. So I had great expectations, but initially creating the combat system turned out to be much easier than I expected. It’s pretty much what you want to have as a game-designer and although my system is pretty much the easiest thing you can come up with, I realized that balancing is pretty damn hard. In my ods-file many things are simplified and in my testing runs I could not only see results which have a negative effect on the gaming experience. For me, the take-away is, to define a system may be easy, but balancing it and making it “fun” and “magical” is a completely different matter.
Furthermore, I don’t like the result of the map generation one hundred percent. Large rooms may contain too few monsters, some levels can be completely empty here is just too much room for improvement. also the connections between the rooms are simply too generic with the combination of the two algorithms, even if levels are different, because after a while each level feels the same.
What doesn’t bother me so much is the easy to outwit pathfinding. Because it offers a pause in fight, in combination with the special attacks that keep tempting me to do stupid things, it brings in a certain degree of difficulty. Nevertheless, a better algorithm would be desirable in combination with better balancing, of course.
But as I said, all in all, I am satisfied.
Rust
Giving that the whole project had the goal to deal with Rust, I would also like to write something about it.
Information to learn
To learn Rust, I mainly used one source and this is “The Book”. It already brings all the information you need to write a small program like mine. You get “The Book”, and also very helpful, an offline copy of the std-doc with the rust-doc package which stores the web pages from rust-lang. org in /usr/share/doc/rust/html/. Having the whole documentation offline on the computer helps, especially if you like me, want to hack something while on the road and having to deal with an shitty mobile internet coverage.
Tooling
I’m not quite satisfied with the rust-tooling. Positive to emphasize is without doubt the close connection to cargo, the build-tool with dependency-management is exactly what I expect from a build-tool: put code to the correct place, configure dependencies and build cargo build, test cargo test, or run cargo run. Everything “works without problems” 😀.
With the IDE’s the situation looks quite similar. I’ve been working for a long time without any IDE, which was quite tiring but possible. This went well for me, for about a month before I finally set up an IDE. The IDE of my choice: intellij IDEA with the intellij-rust plugin. It doesn’t allow me to run a debugger, which is a productivity killer, but it’s better than using the editor. Debugging with gdb is no problem, but making the context change has always kept me occupied. What was also impossible for me, was to set up the std-lib for the plugin. I just couldn’t make it, but for this I’m blaming my own incompetence. All this has been a while now, but if you want to have an up-to-date look at IDE support for rust, I can forward you to Are we IDE yet.
What I think the language is about
You know that feeling, when you learned something and explain it to someone else, and all of a sudden you understand the problem better? I will try that in the following, as I have no claim to correctness, you are welcome to correct me.
For me, Rust can be divided into three concepts: ownership, borrowing and lifetime.
Ownership, as the name says, not only cares about who owns/possess the data, but also limits the lifetime of data. Consider the following code snippet:
fn foobar() {
  let v = vec![1, 2, 3];
  ...
  let v2 = v;
  ...
}
What does ownership or “data possession” mean? In line 1 a new vector is created and assigned to v. v now owns the allocated memory, in the following lines you can perform various operations with v. In line three, the “data sovereignty” is transferred to v2. The Rust compiler now ensures that no access of v is allowed. println! ("{}", v[0]); would now create a compiler error error[E0382]: use of moved value: 'v' .
And what does “limits the lifetime” mean? In the shown code snippet, the function foobar is used to allocate data to stack and heap for the vector v. When leaving our function foobar, the space allocated by v stack and heap will be released. When calling another function within foobar, we could access the data of v, this is possible due to new elements are added on top of the stack (the reference v is preserved). Only when we leave the function foobar, the stack with the data from v will be destroyed.
For me, rust ownership is the limitation of lifetime to stack-state with a “only one can keep the data” rule.
If there is only one “data owner” then, as you might suspect, programming is difficult, for this reason borrowing is added. Consider the following code snipped:
fn size(v: Vec<i32>) -> usize {
  v.len()
}

let v = vec![1, 2, 3];
size(v)
println!("{}", v[size - 1]) // Raises compile error.
After calling the size function, ownership of v was passed, and is no longer accessible after the invocation. But how do we still achieve our length calculation? By “lending” our data to the function: We replace the parameter list of the function with v: &Vec<i32> and the function call with &v. This will pass a reference, or v will be borrowed to the function size.
Let’s take a break for a moment, because I withheld something from you and we have to go back to the beginning. Let’s look at our code snippet from Ownership. the variable v can never change. Why? because it’s not marked as mutable. In many programming languages that I know, mutability refers to the reference, but not in Rust. In Rust, mutablilty applies to the contents of the variable. If, to get back, we want to change the content of a variable in a function, we have to mark the reference and the definition of the variable as mutable:
fn append(v: &mut Vec<i32>) {
  v.push(42);
}

let mut v = Vec::new();
append(&mut v);
println!("{}", v[0]);
So there are two types of borrowing, one mutable and one immutable. As a programmer we have to decide which data can and cannot be changed. Rust, by the way, makes sure that there is no more than one mutable reference (&mut T) at any given time. This mechanism prevents race conditions at compile time because there is only one writeable memory access at a time.
Assuming I have two variables that I have allocated on different stack levels. Now I call a function, which inserts data from the upper stack level into the lower one. That would be an unwise idea, because the data from the upper stack does not exist as long as the data from the lower area, so what happens in such a case? I get a compiler error, of course. Why? Because it cannot be guaranteed that the data is still exists for the lower stack level. That’s what the lifetime parameters are for! In principle, I have to extend the function by a parameter so that the lifetime of the variables can be checked and it is ensured that the lifetime is always correct. In our case that the return values life’s as long as the lower stack level.
Evaluation
What did I like about Rust? Very banal things, such as the different data types. As a Java developer I can choose between Integer and Floating Point, in Rust I also have the choice between Unsigned/Signed integers and I have the data type size. For the programmer, a clear separation of the different data types is already built into the language, without including headers-files, without leaving out anything - nice. Furthermore, I also like Rust’s platform-independence approach, which is nothing new, of course, but nevertheless. I want my program to run on this platform - configure compiler correctly - it runs (theoretically 😀). I think it’s easier to add a backend to a compiler than to provide a full fledged JVM for a platform. I think what I like can be summed up with the deep connection between metal and language 😀. One point I like about the language is the mutablility concept.
What didn’t I like personally? Although “The Book” is a good start, it haven’t helped as much as it could. I don’t think I would have gotten this far without my C knowledge, I think I would have just given up. Another point that I don’t understand are the lifetime operators. I tried to avoid the operators. I don’t think that the source code looks better or becomes easier to understand if the code is flooded with lifetime operators. But these are the 2-cents of a rust rookie. Another point, in the case of Cargo, I told you that “it just works”. Yes? that’s not exactly true. Because even though I added dependency ncurses to my build script, I need ncurses-devel for the headers installed on my machine. Every time I wanted to build my project on a different computer, I got cryptic errors that the headers for ncurses are missing. For me this is an absolute no-go, although I can’t say whether this is a cargo problem, or an ncurses-crate problem, or my problem. But as I stated in the chapter, given I have installed the rust-compiler and cargo, everything I want to type in should be cargo build and that’s it.
Greetings from the present
The blog obviously refers to my experiences in the past and although no one has read this blog post, some criticisms have already been improved. There is a second edition of “The Book” in the making and debugging with intellij should work with CLion (see Are-we-IDE-yet link).
Present Me Out
Conclusion
In my blog post I have shown you quite a lot about my game, its development and functioning. I showed you how I approached Rust and I drew my picture of Rust.
Is Rust now the saviour, if you want to believe my words with 4 months of Rust experience? I don’t think so. Rust gets its security by forcing the programmer to use a more cautious programming style. But I think that people just tend to make mistakes deliberately or unconsciously and with Rust this might be more difficult but not different *cough* unwrap() *cough**cough*. Nevertheless, I like the language and I don’t think this was my last Rust project.
Finally, I would like to honor my father. You’re missed here.